
Mastering the Exposure Triangle: Aperture, Shutter Speed, and ISO
As a photographer, understanding the exposure triangle is crucial for capturing well-exposed and visually stunning images. The three elements—aperture, shutter speed, and ISO—work together to control the light that reaches your camera’s sensor. Mastering this balance allows you to create images that are sharp, properly lit, and creatively composed. Whether you are shooting in bright daylight, a dimly lit room, or trying to capture fast-moving action, knowing how to adjust these settings will give you complete control over your photography.
The Photography Exposure Triangle
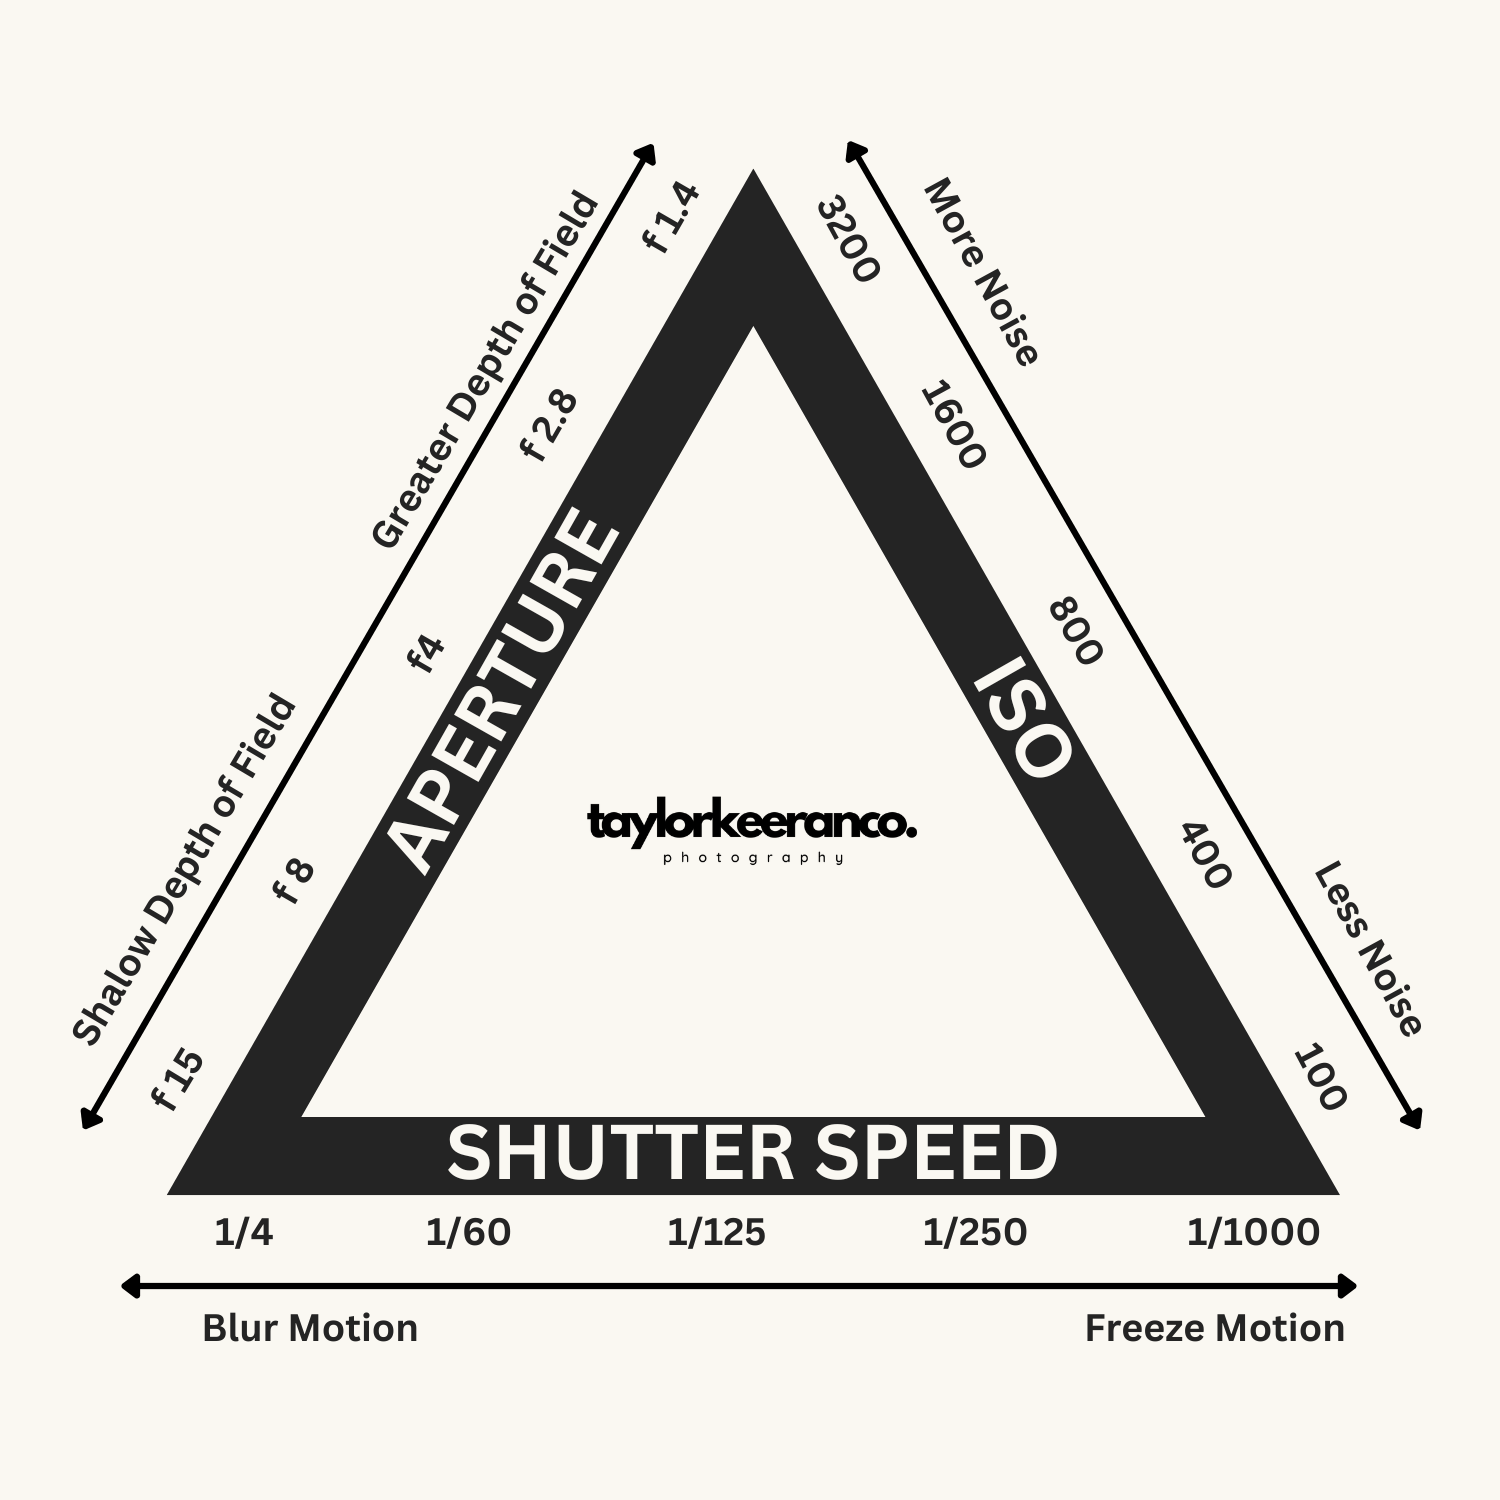
Aperture: Controlling Depth of Field
Aperture refers to the opening in the lens that lets light into the camera. It is measured in f-stops (e.g., f/2.8, f/5.6, f/11). A wider aperture (lower f-number) allows more light in and creates a shallow depth of field, blurring the background for beautiful portrait or macro shots. This effect is commonly used in portrait photography to separate the subject from the background and create a dreamy, professional look.
A narrower aperture (higher f-number) allows less light and results in a deeper depth of field, keeping more of the scene in focus—ideal for landscapes where every detail from the foreground to the background needs to be sharp. However, as the aperture gets smaller, less light enters the camera, which may require adjustments to shutter speed or ISO to maintain a proper exposure.
Shutter Speed: Capturing Motion
Shutter speed determines how long the camera’s sensor is exposed to light. It is measured in fractions of a second (e.g., 1/1000s, 1/250s, 1s). A fast shutter speed, such as 1/2000s, freezes action, making it perfect for sports, wildlife, or fast-moving subjects. This is essential when capturing birds in flight, athletes mid-motion, or water splashes where every drop is crisply defined.
A slower shutter speed, on the other hand, lets in more light and creates motion blur. This is useful for capturing waterfalls with a silky smooth effect, light trails in nighttime photography, or creating a sense of movement in busy urban scenes. When using slow shutter speeds, a tripod is often necessary to prevent unwanted camera shake, ensuring sharp images in the parts of the frame that should remain still.
ISO: Adjusting Light Sensitivity
ISO measures the camera sensor’s sensitivity to light. Lower ISO values (e.g., ISO 100) produce cleaner images with less noise, making them ideal for well-lit conditions. A higher ISO (e.g., ISO 3200 or above) brightens images in low-light situations but can introduce grain or digital noise, which may reduce image quality.
Balancing ISO with aperture and shutter speed is key to maintaining image quality. For example, when shooting at night, increasing the ISO may be necessary to brighten the scene, but this should be done cautiously to avoid excessive noise. Many modern cameras have improved noise reduction capabilities, allowing for cleaner high-ISO images, but understanding the limitations of your camera’s ISO performance is crucial for achieving the best results.
Balancing the Triangle
Understanding how these three elements interact allows you to adjust settings for different lighting conditions and creative effects. For instance:
Bright daylight: Use a low ISO (ISO 100), a fast shutter speed (1/1000s or faster), and a narrower aperture (f/8-f/16) to avoid overexposure and retain details.
Low light without a tripod: A wider aperture (f/2.8 or lower) and higher ISO (ISO 800-3200) help capture more light while maintaining a manageable shutter speed to prevent motion blur.
Motion blur for artistic effect: Use a slower shutter speed (1/10s or slower) with a tripod to create stunning light trails, smooth water effects, or a sense of motion in street photography.
Astrophotography: A wide aperture (f/2.8 or wider), a long shutter speed (15-30 seconds), and a high ISO (ISO 1600-6400) are commonly used to capture the night sky and stars.
Mastering the exposure triangle takes practice, but once you understand how aperture, shutter speed, and ISO work together, you’ll have full creative control over your photography. The key to improving your skills is experimentation—try adjusting one element at a time and observing how it affects your images. Over time, these adjustments will become second nature, allowing you to adapt quickly to any shooting scenario. Whether you are aiming for crystal-clear action shots, dreamy background blur, or stunning low-light photography, mastering the exposure triangle will elevate your photography to new heights.